
How to Install Wazuh Manager
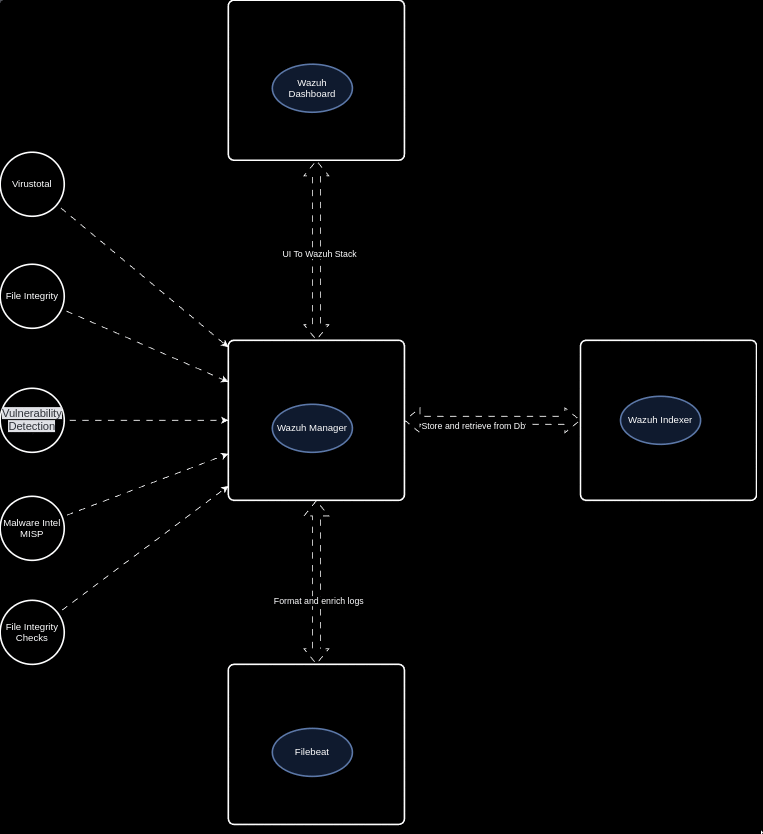
Wazuh is the best open source EDR currently available (in my opinion). Wazuh provides a platform that allows us monitor our endpoints, integrate with 3rd party applications, meet compliance standards, provide multi tenant support, and more! Wazuh supports the most common operating systems and provides the below features right out of the box!
Log Data Analysis File Integrity Monitoring Vulnerability Dection CIS Benchmark Assessment Regulatory Compliance Container Security Wazuh also allows us to create our own detection rules, integrations, and configurations to fit any use case. Open Source for the win!
Ingest Any Logs Wazuh allows us to ingest logs from various applications and services, allowing us to get full visibility into our endpoints. Wazuh natively supports the ability to capture logs from Event Viewer, System messages, JSON, and much more! Wazuh’s flexibiltiy allows for us to create our own custom decoders and rules to be able to handle any type of log! Allow I still haven’t found a good solution for multi line json (why do vendors do this?!).
3rd Party Integrations With so many useful cloud services available, it is more than likely that your organization is involved with at least one. Whether it be Office365, AWS, AntiVirus, a commercial security product (Rapid7, Sophos, SentinelOne, etc.), or a home grown application, we need to bring logs from these services into our security stack.
Wazuh’s built in Python library allows us to build our own integrations to bring events into the platform for more analysis! Don’t you love the customization Open Source provides :)?
API and Active Response Wazuh provides a RESTful API that allows for interaction with the Wazuh Manager. These API endpoints allow us to automate, enrich, pull scan results, etc. which makes our lives much easier. More to come in future posts.
Wazuh’s active response allows us to run a script that is configured to execute when a specific alert, alert level, or rule group has been triggered on an endpoint. Active responses are either stateful or stateless responses and allow us to run defensive actions in real time!
Install This installation details the setup and configuration of our Wazuh Manager. Wazuh Agents will be covered in our next post :).
PREREQUISITES
- WAZUH — Now install the Wazuh Manager:
apt-get -y install wazuh-manager
systemctl daemon-reload
systemctl enable wazuh-manager
systemctl start wazuh-manager
How to Install Filebeat
Install the Filebeat package.
YumAPT
apt-get -y install filebeat
Configuring Filebeat Download the preconfigured Filebeat configuration file.
curl -so /etc/filebeat/filebeat.yml https://packages.wazuh.com/4.9/tpl/wazuh/filebeat/filebeat.yml
Edit the /etc/filebeat/filebeat.yml configuration file and replace the following value:
hosts: The list of Wazuh indexer nodes to connect to. You can use either IP addresses or hostnames. By default, the host is set to localhost hosts: ["127.0.0.1:9200"]. Replace it with your Wazuh indexer address accordingly.
If you have more than one Wazuh indexer node, you can separate the addresses using commas. For example, hosts: ["10.0.0.1:9200", "10.0.0.2:9200", "10.0.0.3:9200"]
Wazuh - Filebeat configuration file
output.elasticsearch:
hosts: ["10.0.0.1:9200"]
protocol: https
username: ${username}
password: ${password}
Create a Filebeat keystore to securely store authentication credentials.
filebeat keystore create
Add the default username and password admin:admin to the secrets keystore.
echo admin | filebeat keystore add username --stdin --force
echo admin | filebeat keystore add password --stdin --force
Download the alerts template for the Wazuh indexer.
curl -so /etc/filebeat/wazuh-template.json https://raw.githubusercontent.com/wazuh/wazuh/v4.9.0/extensions/elasticsearch/7.x/wazuh-template.json
chmod go+r /etc/filebeat/wazuh-template.json
Install the Wazuh module for Filebeat.
curl -s https://packages.wazuh.com/4.x/filebeat/wazuh-filebeat-0.4.tar.gz | tar -xvz -C /usr/share/filebeat/module
Deploying certificates
Note Make sure that a copy of the wazuh-certificates.tar file, created during the initial configuration step, is placed in your working directory.
Replace <SERVER_NODE_NAME> with your Wazuh server node certificate name, the same one used in config.yml when creating the certificates. Then, move the certificates to their corresponding location.
NODE_NAME=<SERVER_NODE_NAME>
mkdir /etc/filebeat/certs
tar -xf ./wazuh-certificates.tar -C /etc/filebeat/certs/ ./$NODE_NAME.pem ./$NODE_NAME-key.pem ./root-ca.pem
mv -n /etc/filebeat/certs/$NODE_NAME.pem /etc/filebeat/certs/filebeat.pem
mv -n /etc/filebeat/certs/$NODE_NAME-key.pem /etc/filebeat/certs/filebeat-key.pem
chmod 500 /etc/filebeat/certs
chmod 400 /etc/filebeat/certs/*
chown -R root:root /etc/filebeat/certs
Configuring the Wazuh indexer connection Note You can skip this step if you are not going to use the vulnerability detection capability. Save the Wazuh indexer username and password into the Wazuh manager keystore using the wazuh-keystore tool:
/var/ossec/bin/wazuh-keystore -f indexer -k username -v `<INDEXER_USERNAME>`
/var/ossec/bin/wazuh-keystore -f indexer -k password -v `<INDEXER_PASSWORD>`
Note The default step-by-step installation credentials are admin:admin Edit /var/ossec/etc/ossec.conf to configure the indexer connection.
By default, the indexer settings have one host configured. It's set to 0.0.0.0 as highlighted below.
<indexer>
  <enabled>yes</enabled>
  <hosts>
    <host>https://0.0.0.0:9200</host>
  </hosts>
  <ssl>
    <certificate_authorities>
      <ca>/etc/filebeat/certs/root-ca.pem</ca>
    </certificate_authorities>
    <certificate>/etc/filebeat/certs/filebeat.pem</certificate>
    <key>/etc/filebeat/certs/filebeat-key.pem</key>
  </ssl>
</indexer>
Replace 0.0.0.0 with your Wazuh indexer node IP address or hostname. You can find this value in the Filebeat config file /etc/filebeat/filebeat.yml.
Ensure the Filebeat certificate and key name match the certificate files in /etc/filebeat/certs.
If you have a Wazuh indexer cluster, add a <host> entry for each one of your nodes. For example, in a two-nodes configuration:
<hosts>
  <host>https://10.0.0.1:9200</host>
  <host>https://10.0.0.2:9200</host>
</hosts>
Vulnerability detection prioritizes reporting to the first node in the list. It switches to the next node in case it's not available.